Imagine this on its side, partially covered with bark, near the base of a tree.

Wouldn't you kinda freak out a little? You wouldn't? Dead squirrel, big deal? Well, not me. I was chanting, "Please be the cache. Please be the cache," as I reached for it. Thank God it was a squirrel figurine with a little jar in its base. Inside were a few trinkets and a cache log. This isn't really a picture of little S but, trust me, that thing looked real. (PS, my
Geocaching total is now 71!)

And I finished the top for Firehorse. It's another prayer quilt, so I don't know who it's going to. Once again, I had barely enough fabric to finish the border, but it came together beautifully. I'm so pleased.I think the border makes it look kinda floaty. No it's not perfect, scrap quilters don't go for perfect. (Thank God!)
Tiny got into Cotillion this year. She has wanted to do so in the past, but got lucky this year. Wait... you don't know Cotillion? Yeah, I didn't know until recently either. It's a big event about eight times a year where the kids learn
- etiquette
- courtesy
- respect
- sensitivity
- ballroom dancing (no, really)
- how to be comfortable when dining at the White House (I swear, that's in the newsletter)
She came out of her first dance floating on a cloud. But here's the thing: there's a strict dress code. Appropriate wear is mandatory. Dresses of modest length for the girls, coats and ties for the boys, and short white gloves for everyone. (By the way, anybody got a pair you'd be happy to part with? She borrowed mine and wasn't pleased to be the only one with crocheted gloves.) Her dress, while it's perfect for dancing, is strappy and she has to wear something to cover her back. So I pulled out the red ribbon I'd bought for the Unending Red Knitted Thing and cast on for a little red shrug.  I think I'll have it done by Saturday! I'm going to call this project Scarlet Ribbons, named after one of my favorite non-traditional Christmas songs.
 On either side of our dining room hangs a strand of twelve tiny stockings. I made these stockings a few years ago and Tiny has loved 'em ever since. They're big enough to hold a few pieces of candy, a lip balm, a gift card, or any number of tiny things from a Korean gift shop that Tiny is partial to.
 Why bother growing up when the toys are still good?


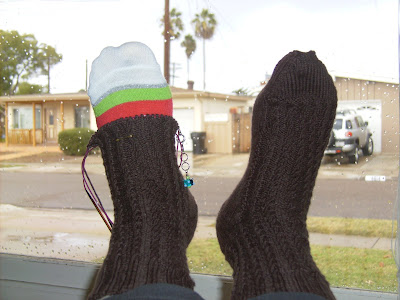 Chocolate Kisses--the Original--was done to pattern until it disappointed me by ending too soon. I had to finish the ball of the foot and the toe in my standard sock style. I even had to frog (rip-it) back over the toe a second time because it was still too short. But I finally got it done.
 And... my goal of reading all six of Jane Austen's published novels this year is completed! Now, that's a good feeling. The funny thing is that if you asked me which one was my favorite, I'd have to say, almost without exception, whichever one I was reading at the time. The last one I read was
 Speaking of hiking, I'm up to 97

 The answer will be revealed at the bottom of this post.
 I've gotten more work done on Chocolate Kisses Socks. They're close to brainless, which makes them a perfect TV watching project. Speaking of TV, I just got the news that
  Are you ready? Do you have your guess?


 Now to the work: This is for a piece that will be lined, with fabric covering the inside. For this reason, I will leave knots and not bother with burying the ends.


 If you're lining the piece, as I am, you don't have to weave in the ends. Don't cut 'em too close, though. Leave tails on the back for extra security.
 Jasmin suggested I add beads to the front, so I did. Just a little, under each bobble. The center one doesn't get a bead because it acts as the toggle in the loop closure. As a very obvious person, sometimes I like a little subtlety.


 I just had the good sense to snap a photo when she was showing it off. Glory is a new knitter and is now building a stash. She admits to being addicted. Wow, that was fast!
 Tiny's going to be Shock, the little witch. She asked me to make her a raisin-purple dress and she'll cover her black witch hat with the scraps. I had to pull off the pink feather boa we had glued to it years ago for the Harry Potter Girl Scout day--you can see a few feathers sticking out if you look closely! I don't usually sew garments without a pattern, so this was a bit of a challenge. She had to put up with puffed sleeves because that's all I know how to do. Eh, she'll live. (And I think I need a little edge-u-ma-kay-shun!)
  I think it looks just a bit Plain Folk. Really, just substitute the pointy black hat for a starched white bonnet and voila! Not that that's a bad thing...


