Sunday, November 29, 2009

Lining a Knitted Pouch or Pocket.

As I've finished my New Earth Bag, I thought I'd go over my instructions for making the lining my way. I like to make the lining stitches invisible and this is how I do it.
  1. Make a lining pocket just slightly smaller than the inside measurements of your pouch. Clip corners and iron seams open. Fold top edge out 1/2" and iron down. Make sure to keep right side of fabric on inside.
  2. Insert lining into bag and pin generously. Those yellow things are my pins.
  3. With needle and thread, come in from wrong side of lining (between lining fabric and knitted fabric) and secure the knot.
  4. Begin stitching, coming up through the top edge of the lining fabric and going out through your knitting. Go under a stitch (here a purl bump) and through another before you go back into the lining. Wiggle the thread as neccessary to hide it. Remove the pins as you get to them.
  5. Continue in this manner all the way around. Knot your stitching in your favorite way and hide the knot. Cut thread and put away the needle before somebody steps on it and blames you for their bad luck.
  6. Admire your handiwork.

If this process doesn't appeal to you, I've decided to offer my services to do it for you. That's right. I can be bought. Well, rented, anyway. Just contact me here on my blog and we'll have a chat.

Saturday, November 28, 2009

Stick a Fork in It!

Good news! I'm stuck in the house. The rain is coming down like reporters on a celebrity just out of rehab. And it's cold. Okay, cold for Southern California. Might be 55 degrees. Brrr, better blanket down the horses, Lizzie! Why is this good news, you might ask?
  1. I'm drinking up our too full tea stash in an effort to warm my insides.
  2. I can wear all the wool socks my little heart--or my little feet--desire.
  3. I'm catching up on my reading. Not of great literature or health updates, but I'm way behind on my blogs.
  4. I now have a chance to finish Chocolate Kisses by my deadline of this Sunday. And it's Saturday.
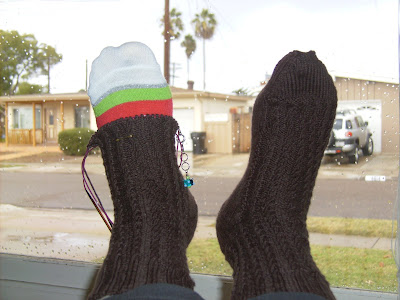
Chocolate Kisses--the Original--was done to pattern until it disappointed me by ending too soon. I had to finish the ball of the foot and the toe in my standard sock style. I even had to frog (rip-it) back over the toe a second time because it was still too short. But I finally got it done.
Chocolate Kisses--the Second Sock--is being created in a way that mimics the Original but is not "refootable." I decided to use a super-stretchy cast-on. It resisted and resisted, but I finally beat it into submission. That mostly called for, um, paying attention to the instructions. Who would have guessed?And... my goal of reading all six of Jane Austen's published novels this year is completed! Now, that's a good feeling. The funny thing is that if you asked me which one was my favorite, I'd have to say, almost without exception, whichever one I was reading at the time. The last one I read was Northanger Abbey: I think it was the best one for me. But it couldn't make a good teleplay or movie without a narrator. Jane was really quite present in the story: she had a wry wit about her own stories and the popularity of "horrid novels." So there was a regular interruption in the tale, explaining why the main character wouldn't be a good heroine or that nothing intervened to stop her from meeting someone important. This was certainly the funniest. And therefore the best.

Monday, November 23, 2009

A Sock With an Agenda

This sock has it in for me. After all the attention and almost monogamous knitting I've given to it, you'd think it would be grateful. Loving. Appreciative. But no. It hates me. How do I know it hates me? Let me enumerate.
  1. No matter how I twist the stitches, I still wind up with holes where I picked up the instep.
  2. The first time I finished it, including grafting the end, it was too short. The above picture is at the point in the pattern where I am supposed to decrease for the toe. Really?
  3. The second time I finished it, it was still too short.
  4. It makes my hands hurt. Normal yarn doesn't do that so easily.
  5. I set a goal of finishing the PAIR by November 29. It's trying to drag me down.
I think it knows I put brown in contention, along with orange, for my least favorite colors. I thought I had disguised my, at best, ambiguity towards that color by giving it a sweet name: Chocolate Kisses. Clearly, it's on to me. I think it's time I take it out into the woods and have a little "hunting accident," never mind that I don't hunt. Maybe a "hiking accident."
Speaking of hiking, I'm up to 97 geocaches found--almost to my first milestone of 100. One of the most recent was amazing: Pirate Landing. The cacher went over the top on this one: burlap and leaves were glued to the top of the container and the whole thing had a serious pirate theme. Very cool!
And then there are hiking socks: these are the ones I knitted from Wick: 49% soy yarn. I must be wearing them a lot because I'm washing 'em every week. They're comfortable inside my hiking boots and my walking shoes. And Tiny said, "Those look like real socks." That's success.

Thursday, November 12, 2009

Are You Smarter Than a Fifth Grader?

Look at all these little parts. What could these bits and bobs be when assembled? Here's a hint:The answer will be revealed at the bottom of this post.
I've gotten more work done on Chocolate Kisses Socks. They're close to brainless, which makes them a perfect TV watching project. Speaking of TV, I just got the news that Dollhouse has been cancelled. It's one of my current faves and I'll be sad to see it go.

And more brainless knitting (until I get to the hard parts): I'm calling this Pretty Cylon Baby because I started it for the Battlestar Galactica Fleet Power Battle on Ravelry. It's for an adorable baby, but aren't they all?! Are you ready? Do you have your guess?

And the answer is: a hippity hoppity bunny rattle! It's from the same book as the above sweater, Itty-Bitty Nursery, but understandably much faster.
Did you guess it? If you did, you may be smarter than a fifth grader. And probably me.

Wednesday, November 11, 2009

Sock World

This yarn is too bright. Too too bright. I knitted up a whole half-a-sock before I saw that. But I couldn't ignore it. So I pulled it out. Completely back in the ball. I think it will be stunning with black. But all by itself: no. Not on my watch.
And I started working with this yarn: Rowan Calmer. This stuff feels sooooo good. Must be the microfiber. I'm making socks with it. Ooh, surprise, socks, I hear you saying. The color is dark chocolate, so I'm calling this project Chocolate Kisses. Yummy!
Dinner out with the fam tonight. So nice, we went to a pan-Asian restaurant on the beach. We had pineapple curry, Chinese fried rice, and mysterious skinny noodles with tofu. The decor was Thai/New Orleans. Sounds weird, but it was great.
Brain tired. Must sleep now.

Tuesday, November 3, 2009

Beading on Knits Tutorial

What you'll need:


  1. A finished piece of knitting or crochet--why, I just happen to have one here! (Yes, I finished knitting the New Earth Bag for Pretties and sewed up the sides.)

  2. Beads of appropriate size and color--it's okay to audition various types. I find that just laying them on top of the fabric will tell me if I want 'em.

  3. A needle that will go through the beads with room to spare for the thread

  4. Thread. I got mine in a very special way: I happen to be working with a yarn that is really eight strands twisted together. I untwisted the end and pulled out a strand at a time. I threaded my needle with two strands and that worked just fine. You could also use sewing thread or beading thread, depending on how much wear your finished piece will be getting. Mine will get very little so I can go easy.

Now to the work: This is for a piece that will be lined, with fabric covering the inside. For this reason, I will leave knots and not bother with burying the ends.

  1. Tie a knot in the end of your thread, leaving a tail of about 1". Anchor your thread in the back of your work.
  2. Come up through the fabric where you want your beads to start.
  3. Thread your beads onto your needle. Here I used four.
  4. Here's a tricky part: slide the beads down to your fabric and lay them down as you want them to be sewn. Take the needle under the knitted stitch at the end of the bead row. Go under more stitches until you get to about the center of the bead row. (For this project it was 3 purl bumps and 2 beads.) You may notice that I moved the unanchored beads away so we can see where the needle is going.
  5. Draw up the slack in the thread, gently! Don't tighten it. Now you can see the thread coming out about halfway on the bead row.
  6. Take the needle back through the first half of the bead row. This will keep the beads from flipping around.
  7. Go down through the fabric and back to step #2.

Continue like this until you can say, "Aw done!" If you're lining the piece, as I am, you don't have to weave in the ends. Don't cut 'em too close, though. Leave tails on the back for extra security.Jasmin suggested I add beads to the front, so I did. Just a little, under each bobble. The center one doesn't get a bead because it acts as the toggle in the loop closure. As a very obvious person, sometimes I like a little subtlety.And here it is! Ready for lining. I may just do a photo tutorial on that later.